

- Automated code reviews for newly created merge requests
- AI-powered suggestions displayed directly on merge requests
- Interactive assistance through the CodeRabbit bot for real-time feedback
- Seamless integration with your existing GitLab workflow
To interact with CodeRabbit in merge request comments, use
@coderabbitai — or the username of the service account you configure below, if it differs.Using self-hosted GitLab? See our Self-managed
GitLab integration guide for on-premises
installations.
GitLab Access Tokens
A GitLab admin is required for the one-time access token setup.
Personal Access Token
Create a dedicated service account for CodeRabbit with a personal access
token
Group Access Token
Use GitLab Premium/Ultimate’s group tokens with automatic bot user creation
Personal Access Token
We recommend creating a new user as a service account, associating this user to the group you’d like to install CodeRabbit on, and providing CodeRabbit with the personal access token to allow access. During the installation process, CodeRabbit will automatically configure the required webhook for seamless integration.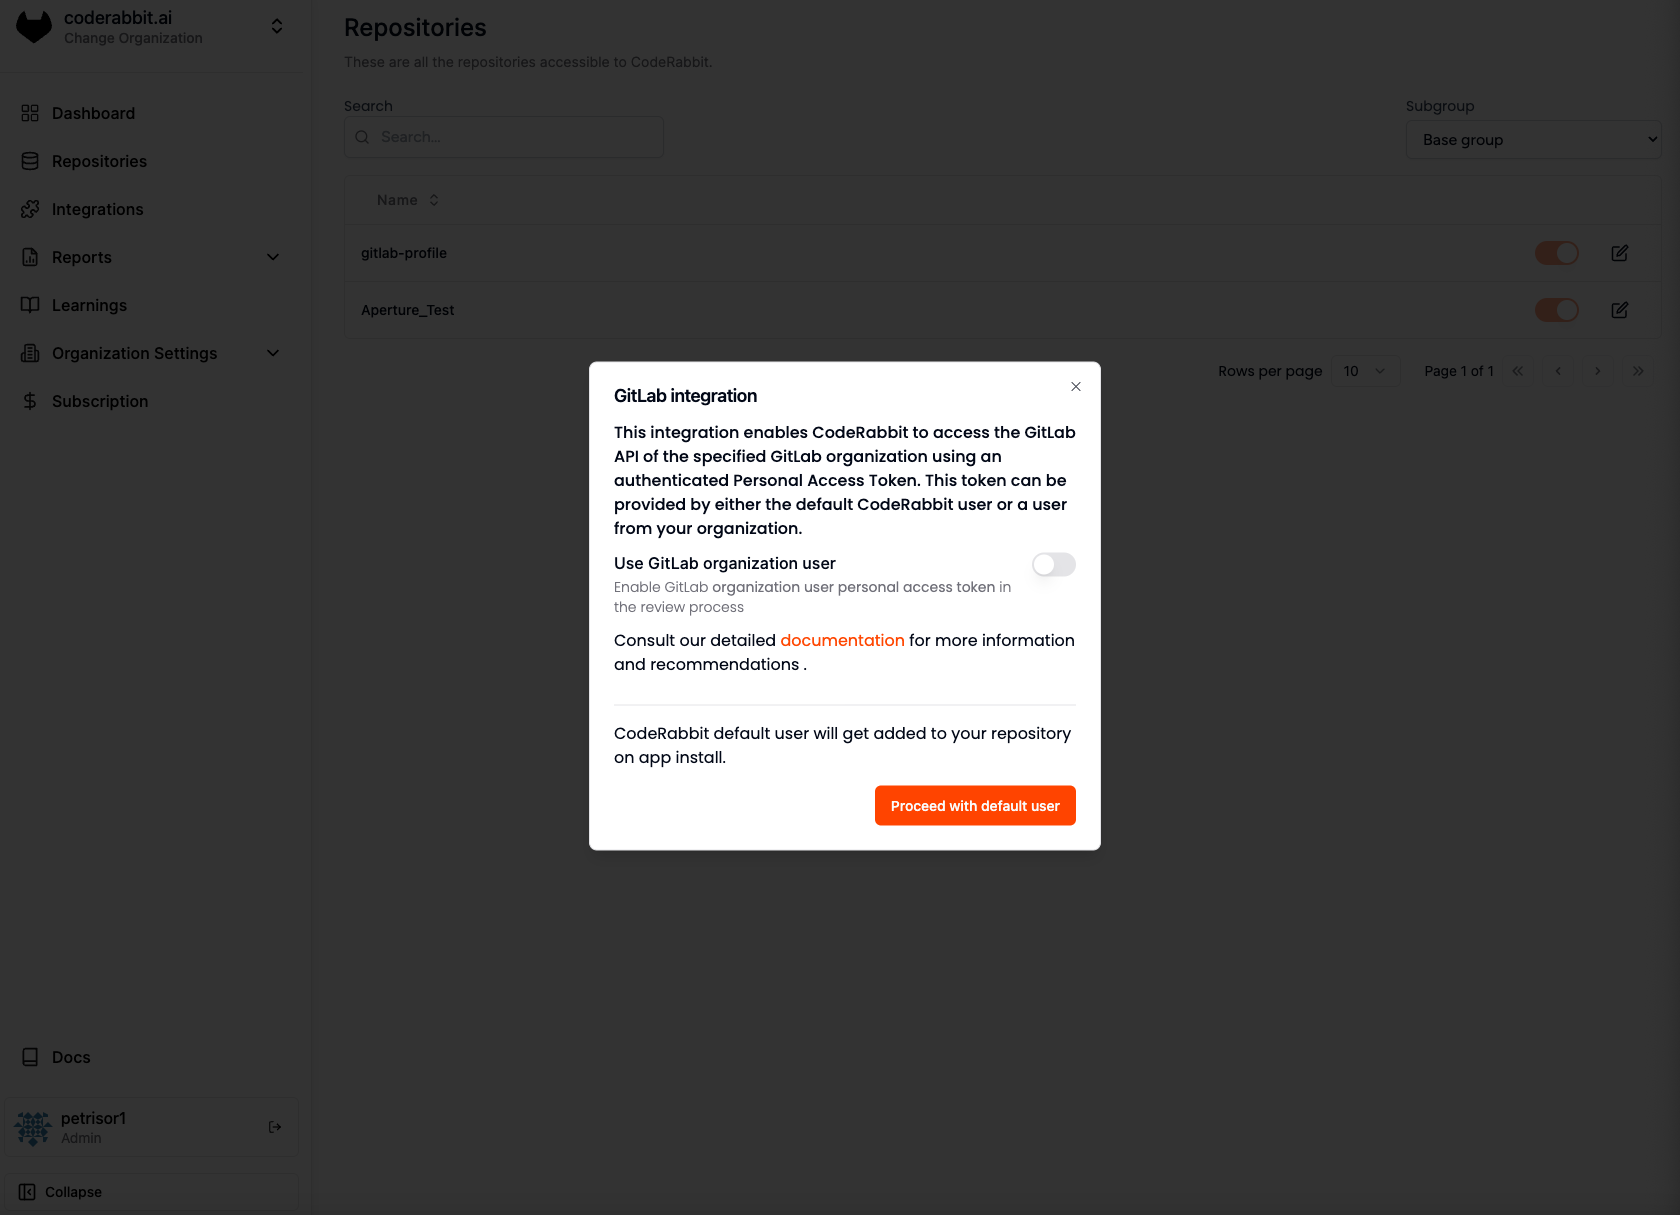
If you wish to change the review user, you must provide the access token for
the new user who will post reviews and comments. However, this requires
manually removing the previous user from the projects and associated webhooks.
Once this is done, you will need to reinstall the CodeRabbit app for each
project.
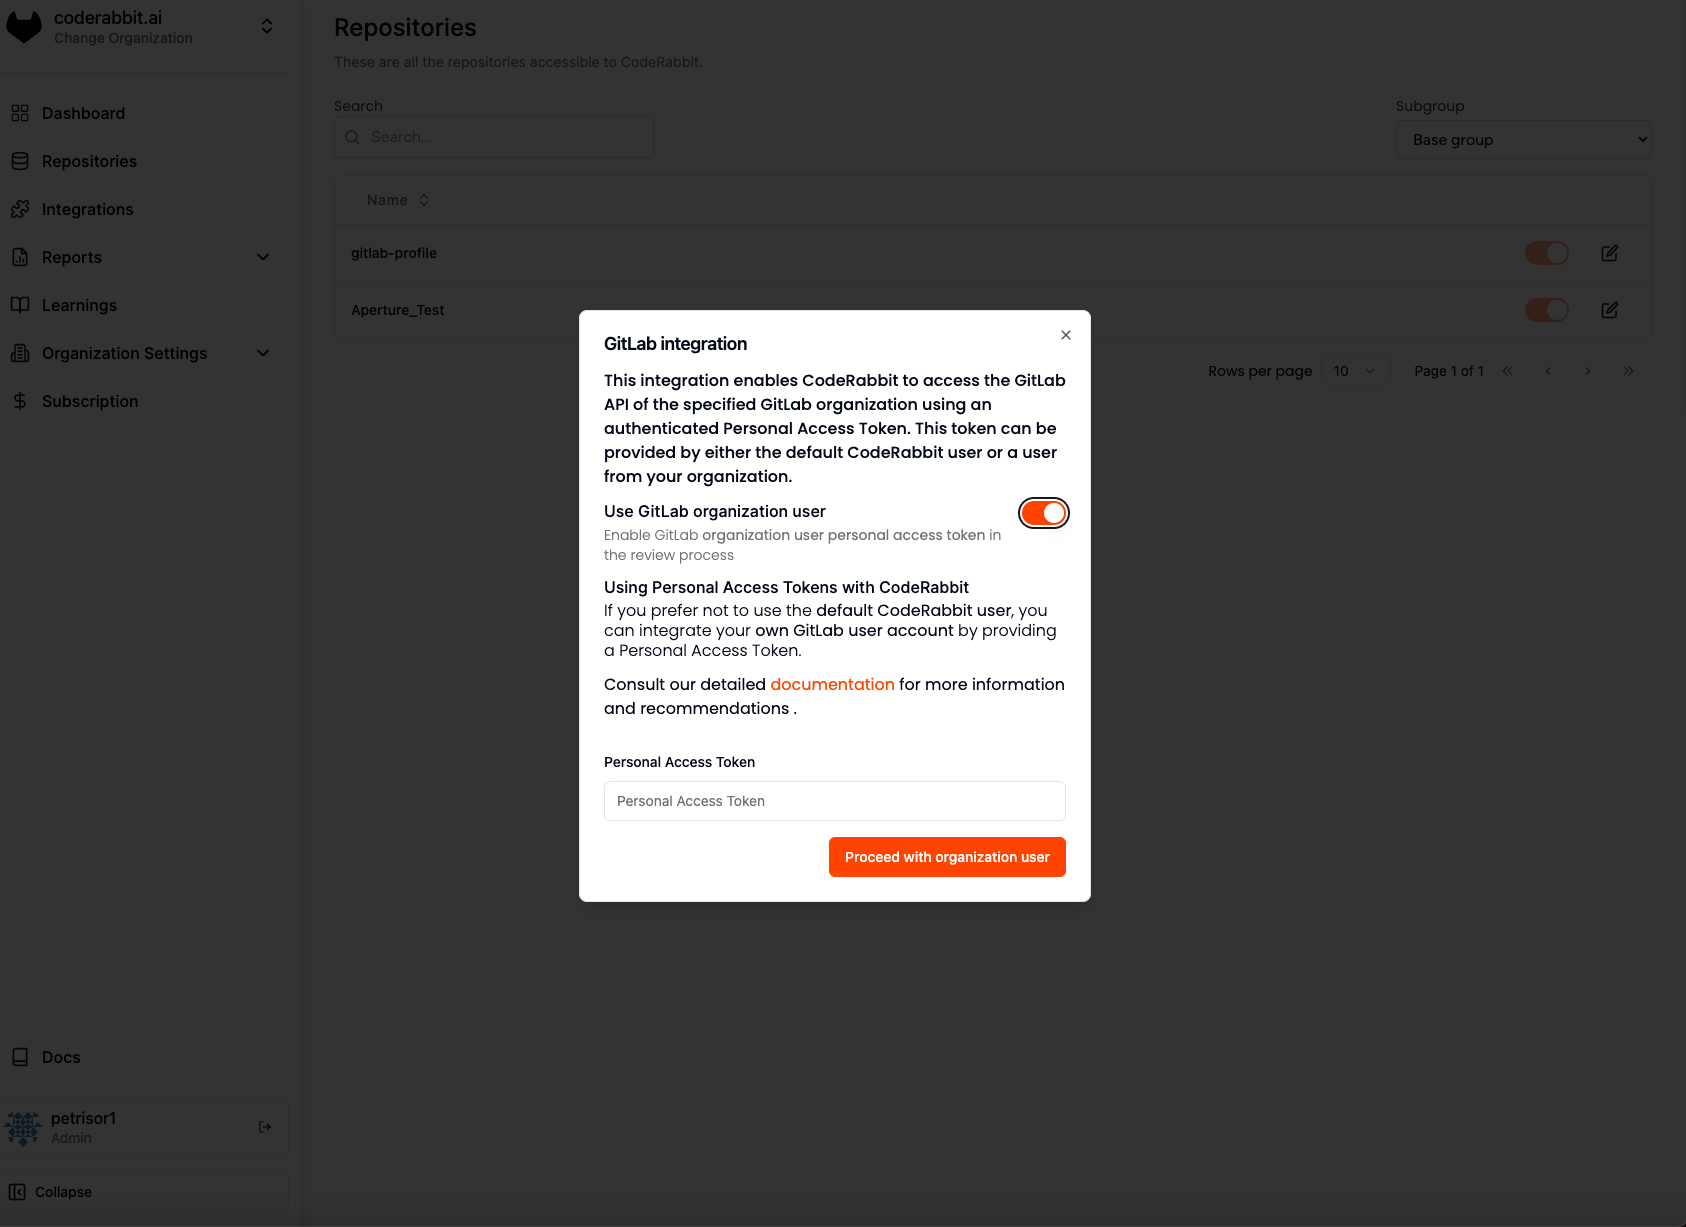
Best Practices for Service Account Setup
Follow these recommendations when setting up your CodeRabbit service account:- Username: Use “CodeRabbit” as the username for easy recognition
- Email: Use a dedicated email address for easy identification and management
- Profile picture: Use the CodeRabbit logo for easy recognition. Download our logo here
- Permissions: Ensure the dedicated user has at least Developer access to the group or projects where you want to install CodeRabbit
Important Considerations
Review Attribution: Code reviews will be attributed to the owner of the
personal access token, so they’ll appear to come from your service account
user.
- Navigate to the GitLab User page in the sidebar
- Enter the new access token and click the Update button
Generating a Personal Access Token
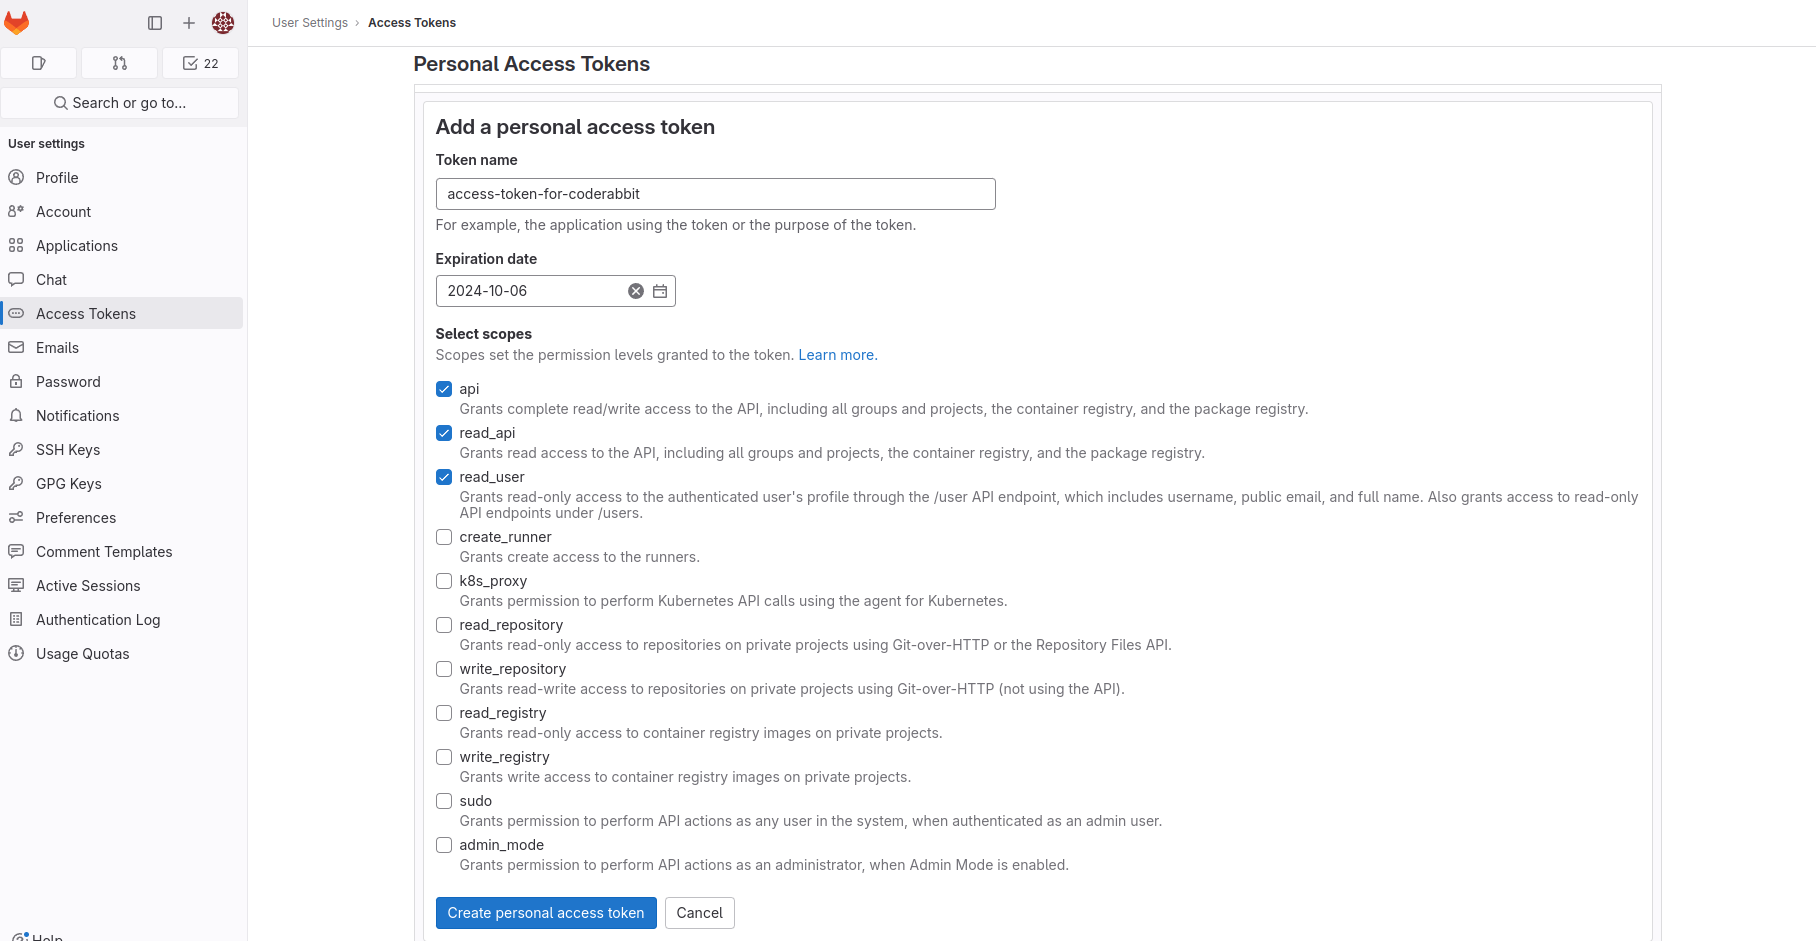
1
Log in to your CodeRabbit service account
Log in using the user designated for CodeRabbit reviews. This user serves as
a service account for managing reviews and related activities.
2
Navigate to access tokens
- Select your avatar on the left sidebar 2. Choose Edit Profile 3. Select Access Tokens from the left sidebar 4. Click Add New Token
3
Configure token settings
- Enter a descriptive name for the token (e.g., “CodeRabbit Integration”)
- Set an expiry date for the token
If no expiry date is entered, it defaults to 365 days from the current
date.
4
Select required scopes
Ensure the following scopes are selected: -
api - Full API access -
read_api - Read-only API access - read_user - Read user information5
Create and save the token
- Click Create Personal Access Token 2. Important: Copy and securely store the token immediately as it will only be displayed once
Group Access Token
Creating a Group Access Token in GitLab automatically generates a bot user. Ensure that the token is configured with Developer access. Once set up, you only need to provide this token for integration. Note that a Group Access Token is limited to the scope of the group where it was created. To configure additional groups, you will need to generate a separate Group Access Token for each group.By default, GitLab restricts this option to users on the Premium or Ultimate
tiers.
Generating a Group Access Token
1
Navigate to your group
Navigate to the group you wish to install CodeRabbit on.
2
Access token settings
- Select Settings from the left sidebar 2. Select Access Tokens within the Settings heading
3
Create the token
- Create a Group Access Token 2. Ensure the
apiscope is selected 3. Ensure Developer Access is provided
Group Access Tokens create bot users with generic GitLab-generated usernames (like
group_63_bot_5753...). If you prefer a more descriptive username for your CodeRabbit bot, you can customize it using the GitLab API.You can find the user ID of the bot through the CodeRabbit UI if connected, or by visiting the bot user’s profile from your Group Members page in GitLab.Configuring Access Tokens in CodeRabbit
GitLab project Owners and Maintainers can install CodeRabbit on individual projects from the Repositories page without requiring top-level GitLab group Owner access, including projects inside subgroups. The Install Group action is restricted to GitLab group Owners. By default, if no access token is provided, CodeRabbit prompts you to provide one during installation. To provide the token beforehand, open Account in the left sidebar, then under Provider settings, click GitLab User. Once you enter the token, CodeRabbit validates it and saves it for future use. You can confirm the correct user is being selected by verifying the user ID shown on the UI with the user ID of the service account user you created.Repository Installation
You can install CodeRabbit on individual GitLab projects or across a full GitLab group, depending on your GitLab role. Projects are selectable based on your permissions:- Project installation: GitLab project Owners and Maintainers can install CodeRabbit on the selected projects without top-level group Owner access.
- Group installation: Installing CodeRabbit for an entire GitLab group requires GitLab group Owner access, and the installation covers repositories in that group and its subgroups, including repositories added later. Group-wide install and uninstall actions are managed from the top-level group; when browsing a subgroup, the group-wide action is not shown, but you can still select individual repositories or, if you manage the top-level group, choose View top-level group to manage the group installation.
1
Access repository settings
Go to the Repositories
page in the CodeRabbit
app.
2
Select repositories
Select the checkbox next to the projects where you want to install CodeRabbit.
3
Install CodeRabbit
Select Install Repositories to complete the installation.
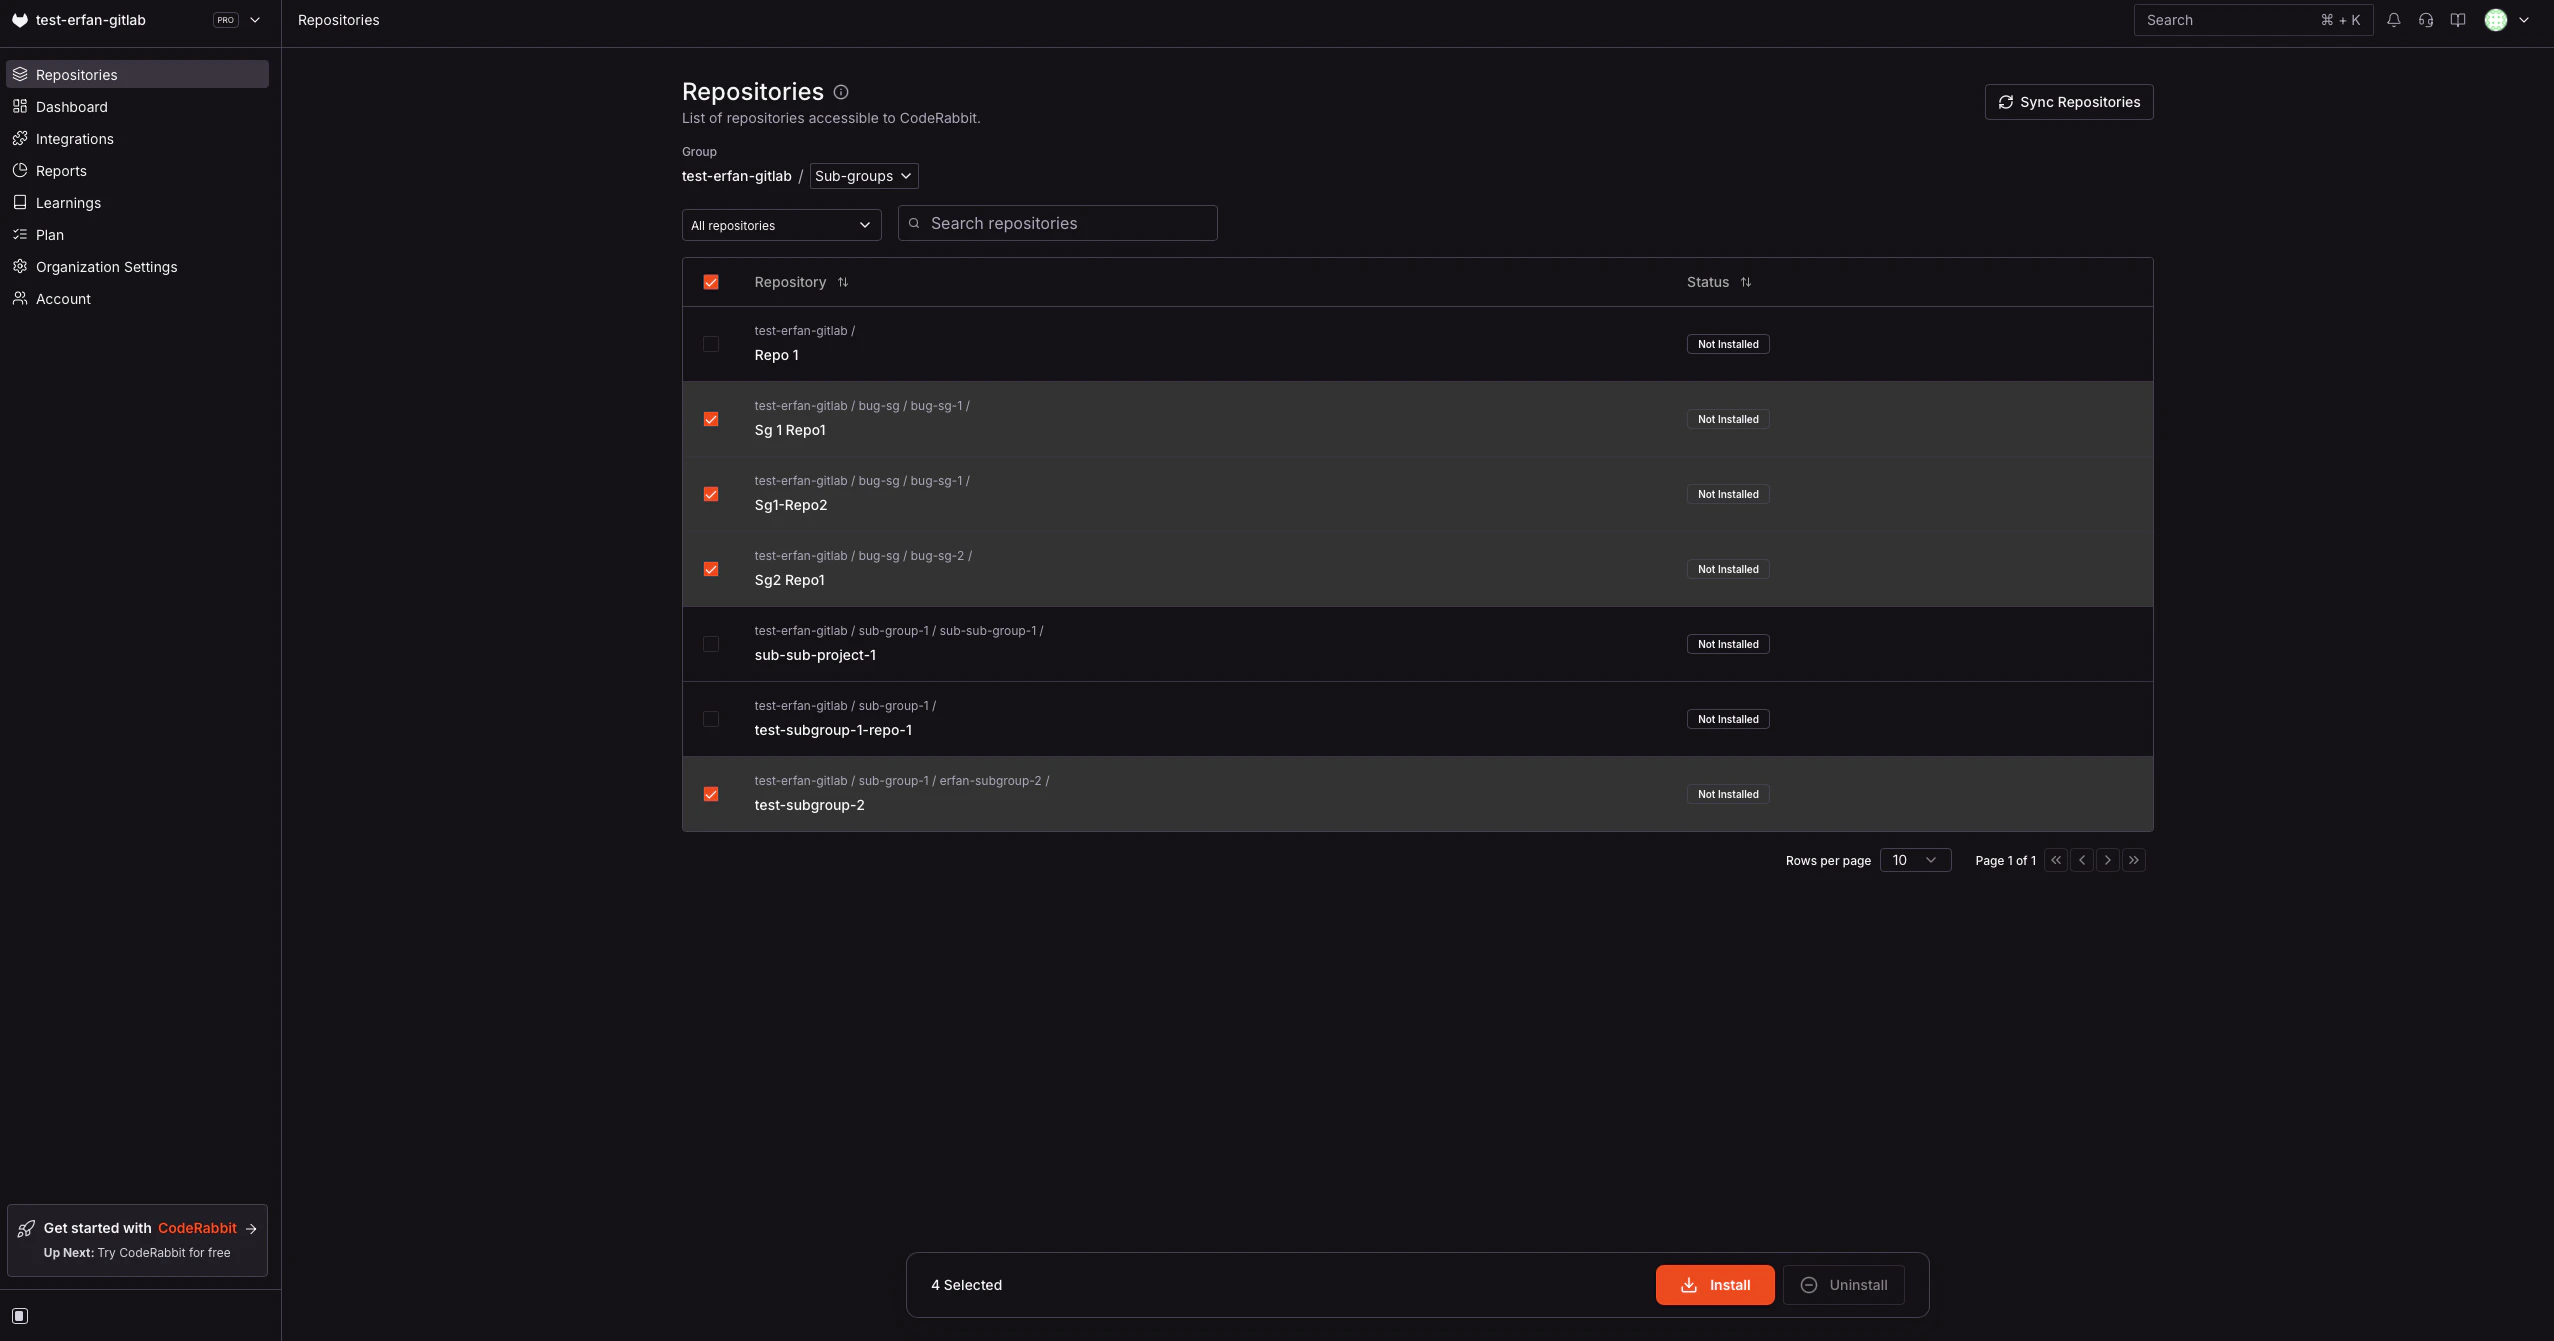
Selectable and unavailable GitLab projects on the CodeRabbit Repositories page
https://coderabbit.ai/gitlabHandler will now be installed for the projects selected.
Automatic installation for new group repositories
After a GitLab group Owner completes the Install Group action, CodeRabbit also covers repositories that are later created in or added to the installed group and its subgroups. You do not need to select and install each new repository individually. This behavior relies on the group-level webhook and token installation. Use a Group Access Token where applicable, and complete the group installation as a GitLab group Owner.On GitLab.com, Group Access Tokens are available on the Premium and Ultimate tiers.
Manual webhook installation
If you install repositories from the Repositories page, CodeRabbit configures the webhook automatically. Use this flow only when you need to install the webhook manually or rotate the shared webhook secret. The Webhook Secret page is available in CodeRabbit for supported Git providers, including GitLab.com and self-managed GitLab. For an instance-wide shared secret on self-managed GitLab, use Workspace Git credentials.1
Open Webhook Secret settings
In the CodeRabbit app, open Account and select Webhook Secret from
the sidebar.
2
Copy the webhook URL
Use the Webhook URL field on that page to copy the exact endpoint that
your GitLab project or group should call.
3
Save or change the webhook secret
Enter the secret that GitLab should send with webhook deliveries and save
it in CodeRabbit.
4
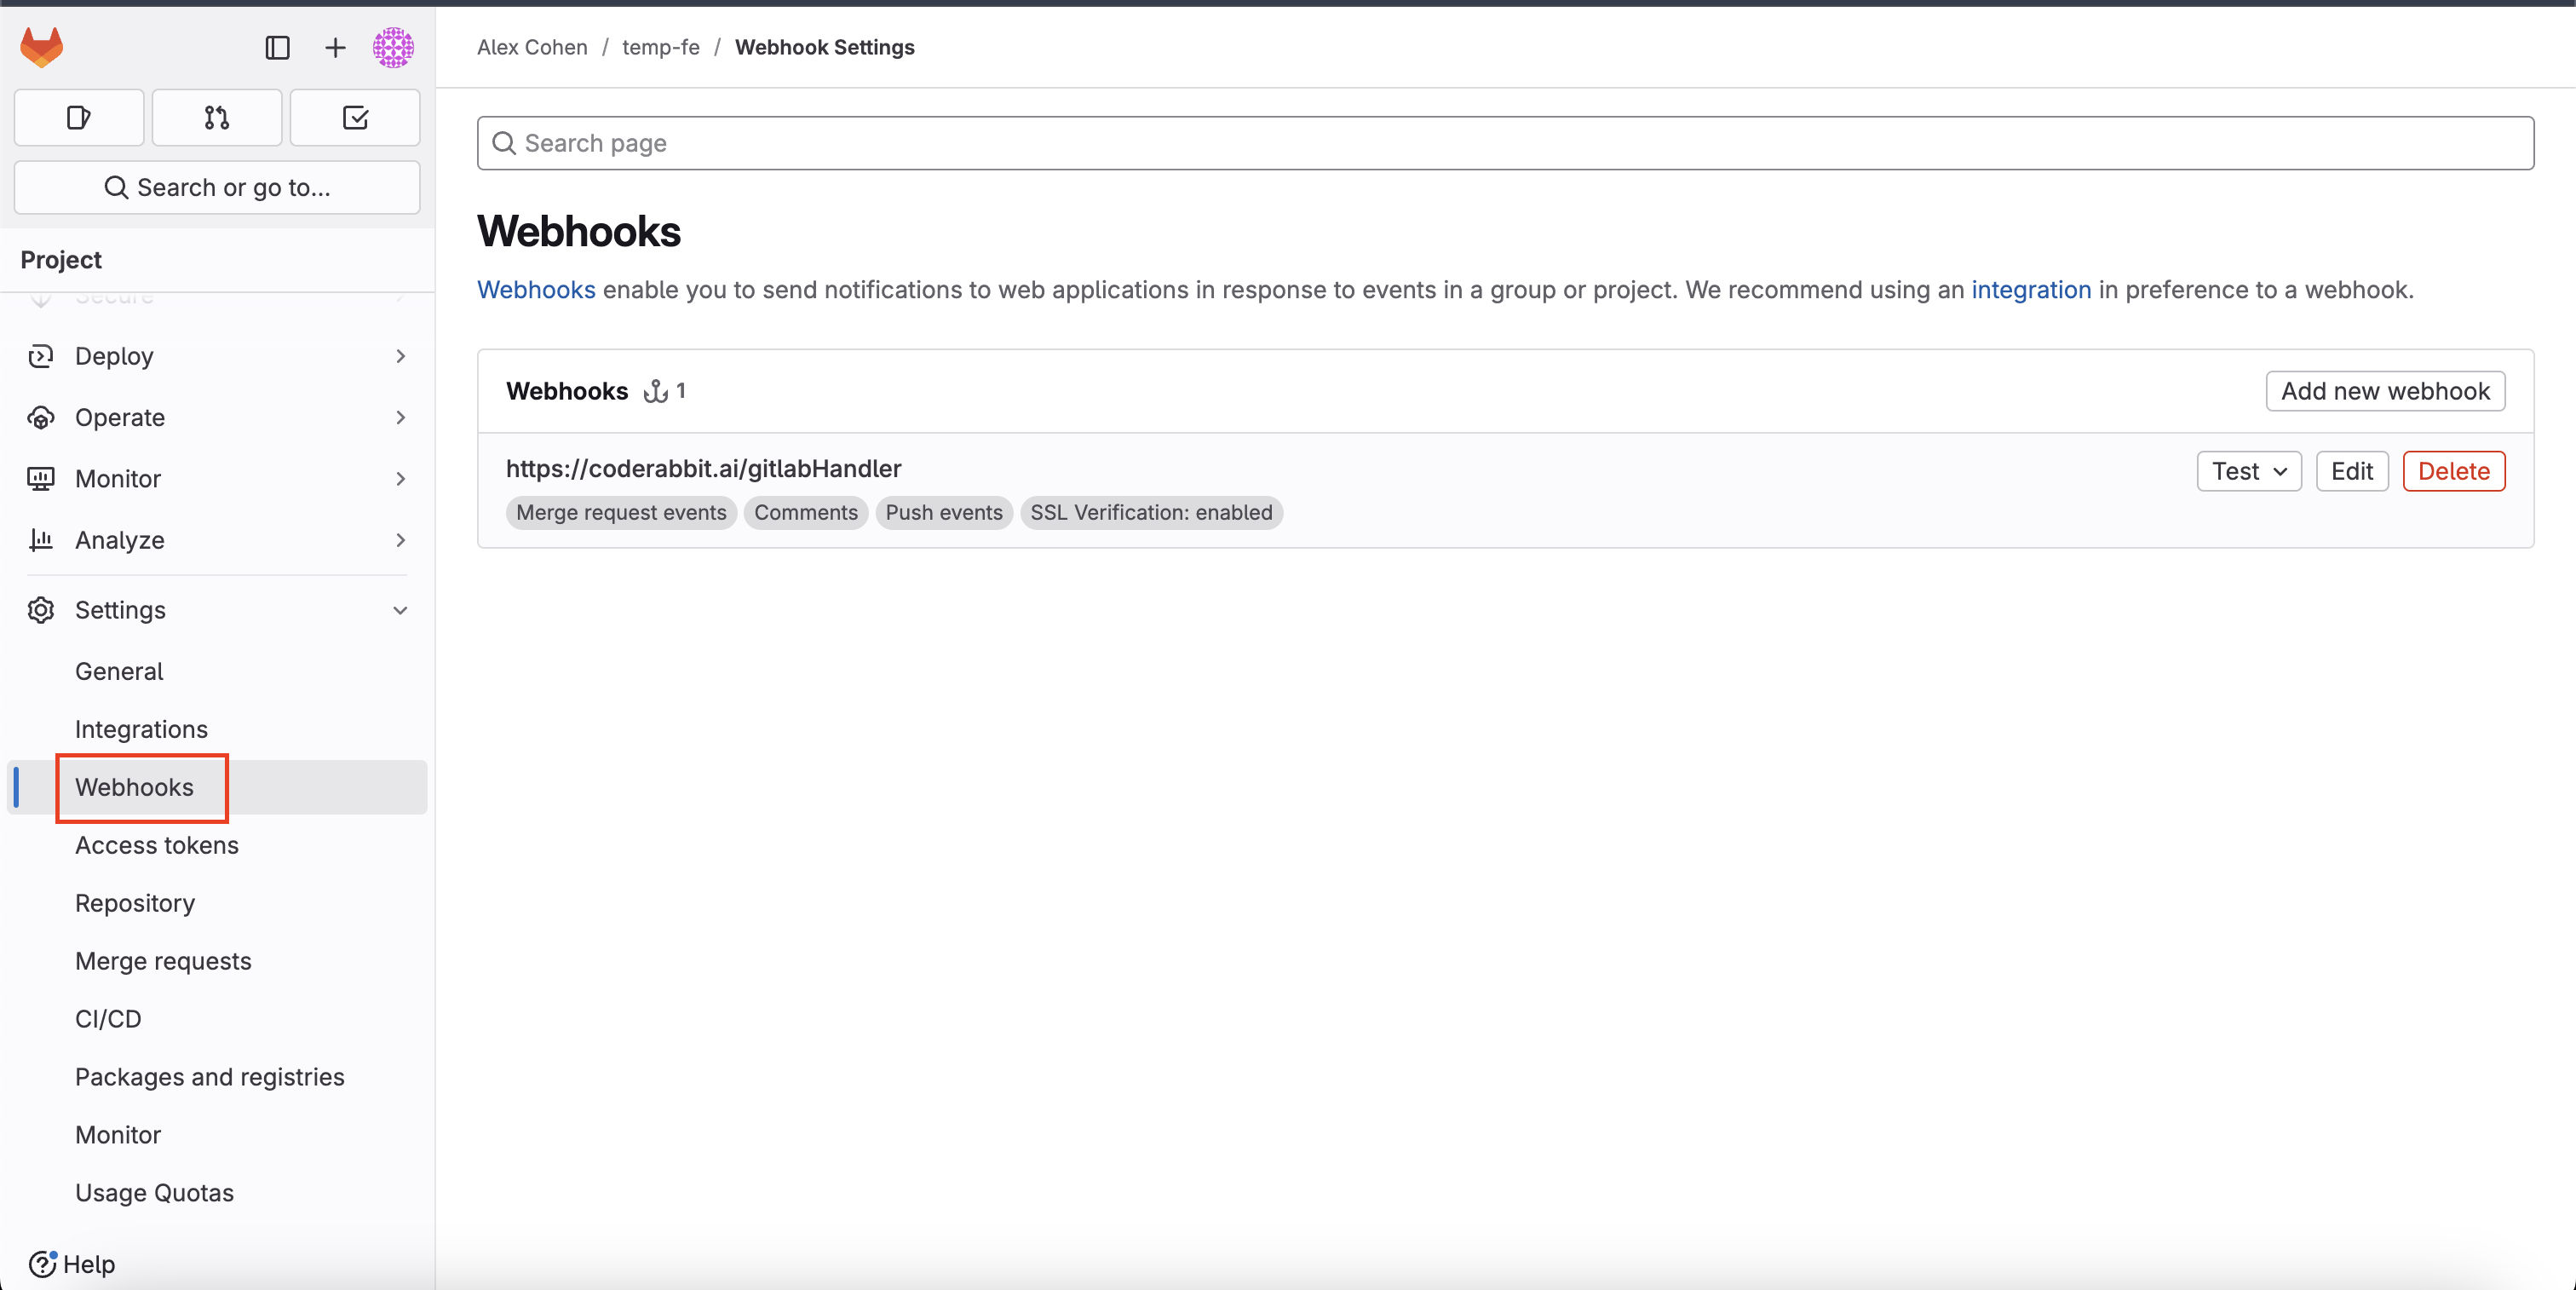
Configure the GitLab webhook
When creating or editing the webhook in GitLab, use the copied webhook URL
and enable these settings:
- Merge request events
- Comments
- Issues events
- SSL verification enabled
If you change an existing webhook secret, CodeRabbit attempts to update existing CodeRabbit-managed GitLab project and group webhooks automatically. If a webhook was created manually, or if an automatic refresh fails, update the secret directly in GitLab.
Troubleshooting
If you are experiencing issues with the webhook, such as CodeRabbit not being able to access the repository, or not reviewing merge requests, you can manually delete the webhook from the repository.Then refresh the repository page in the CodeRabbit app and reinstall the webhook.If you cannot install the webhook, please check that your GitLab user has the necessary permissions to install the webhook and the PAT is not expired.