

Getting started
To integrate your self-managed GitLab with CodeRabbit, we require specific information for the initial setup within your domain. Once this setup is complete, you can log in directly using the OAuth2 flow.Visit CodeRabbit login page
Enter your GitLab instance URL
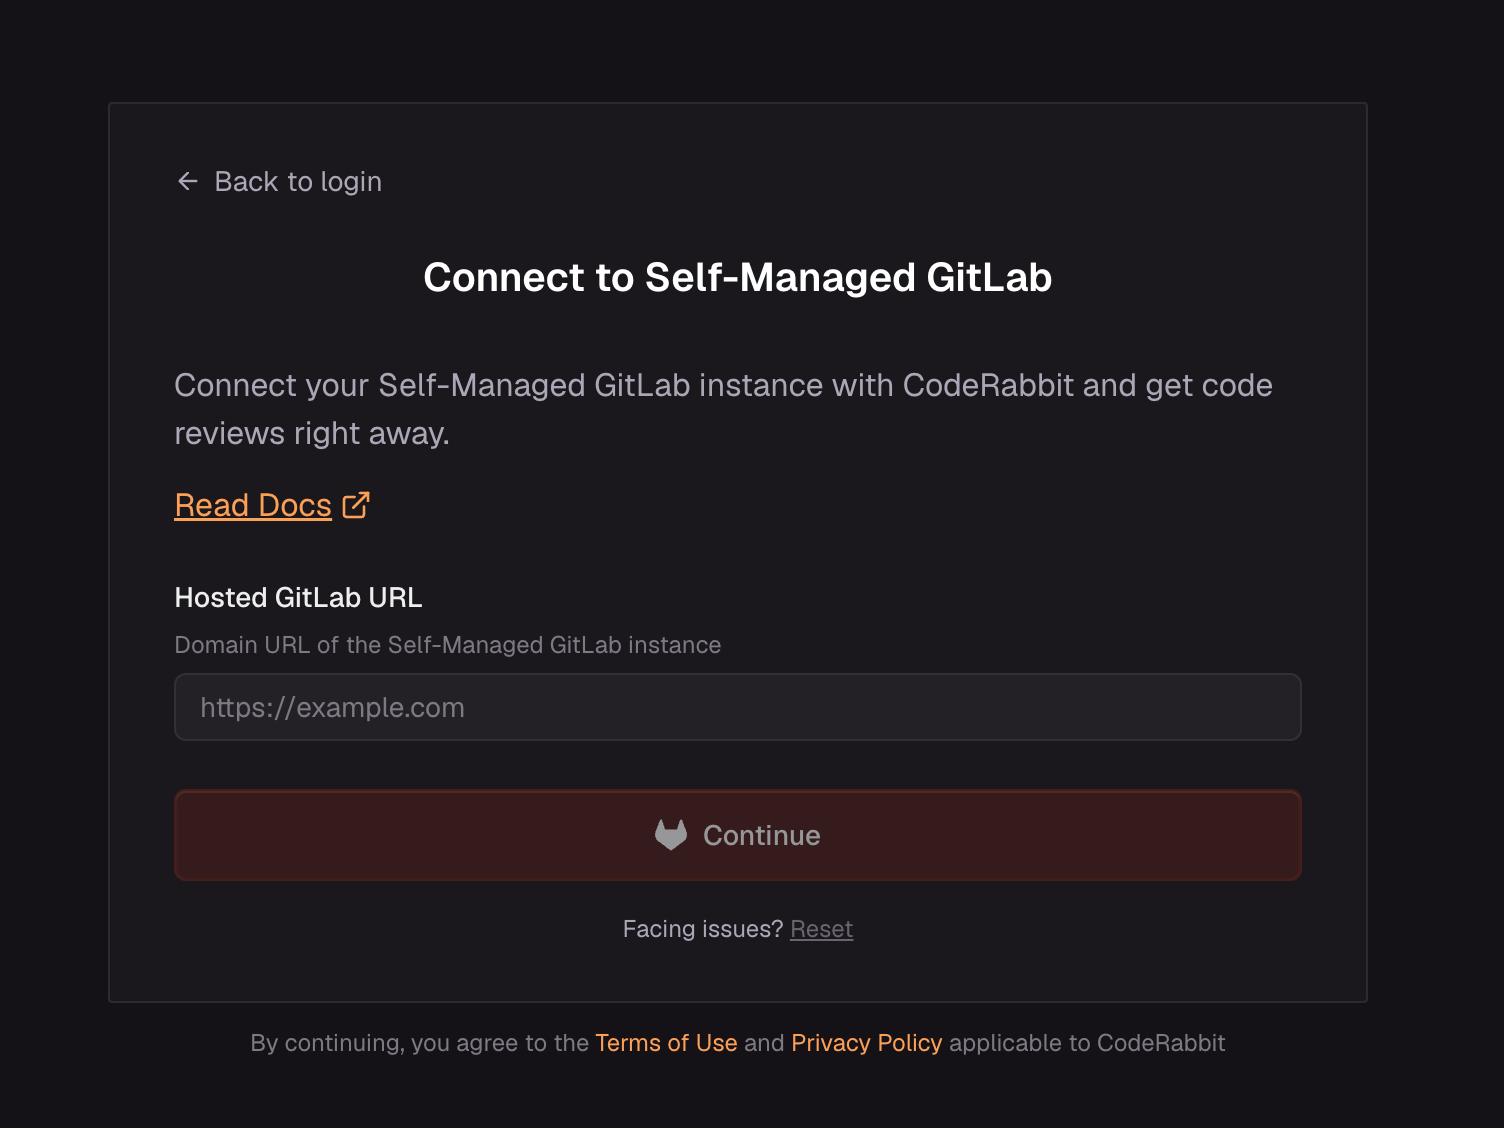
Connect to Self-Managed GitLab page with the GitLab instance URL field
Choose onboarding method
automated (recommended) or manual onboarding based on your security preferences and administrative access.Onboarding options
Automated onboarding (recommended)
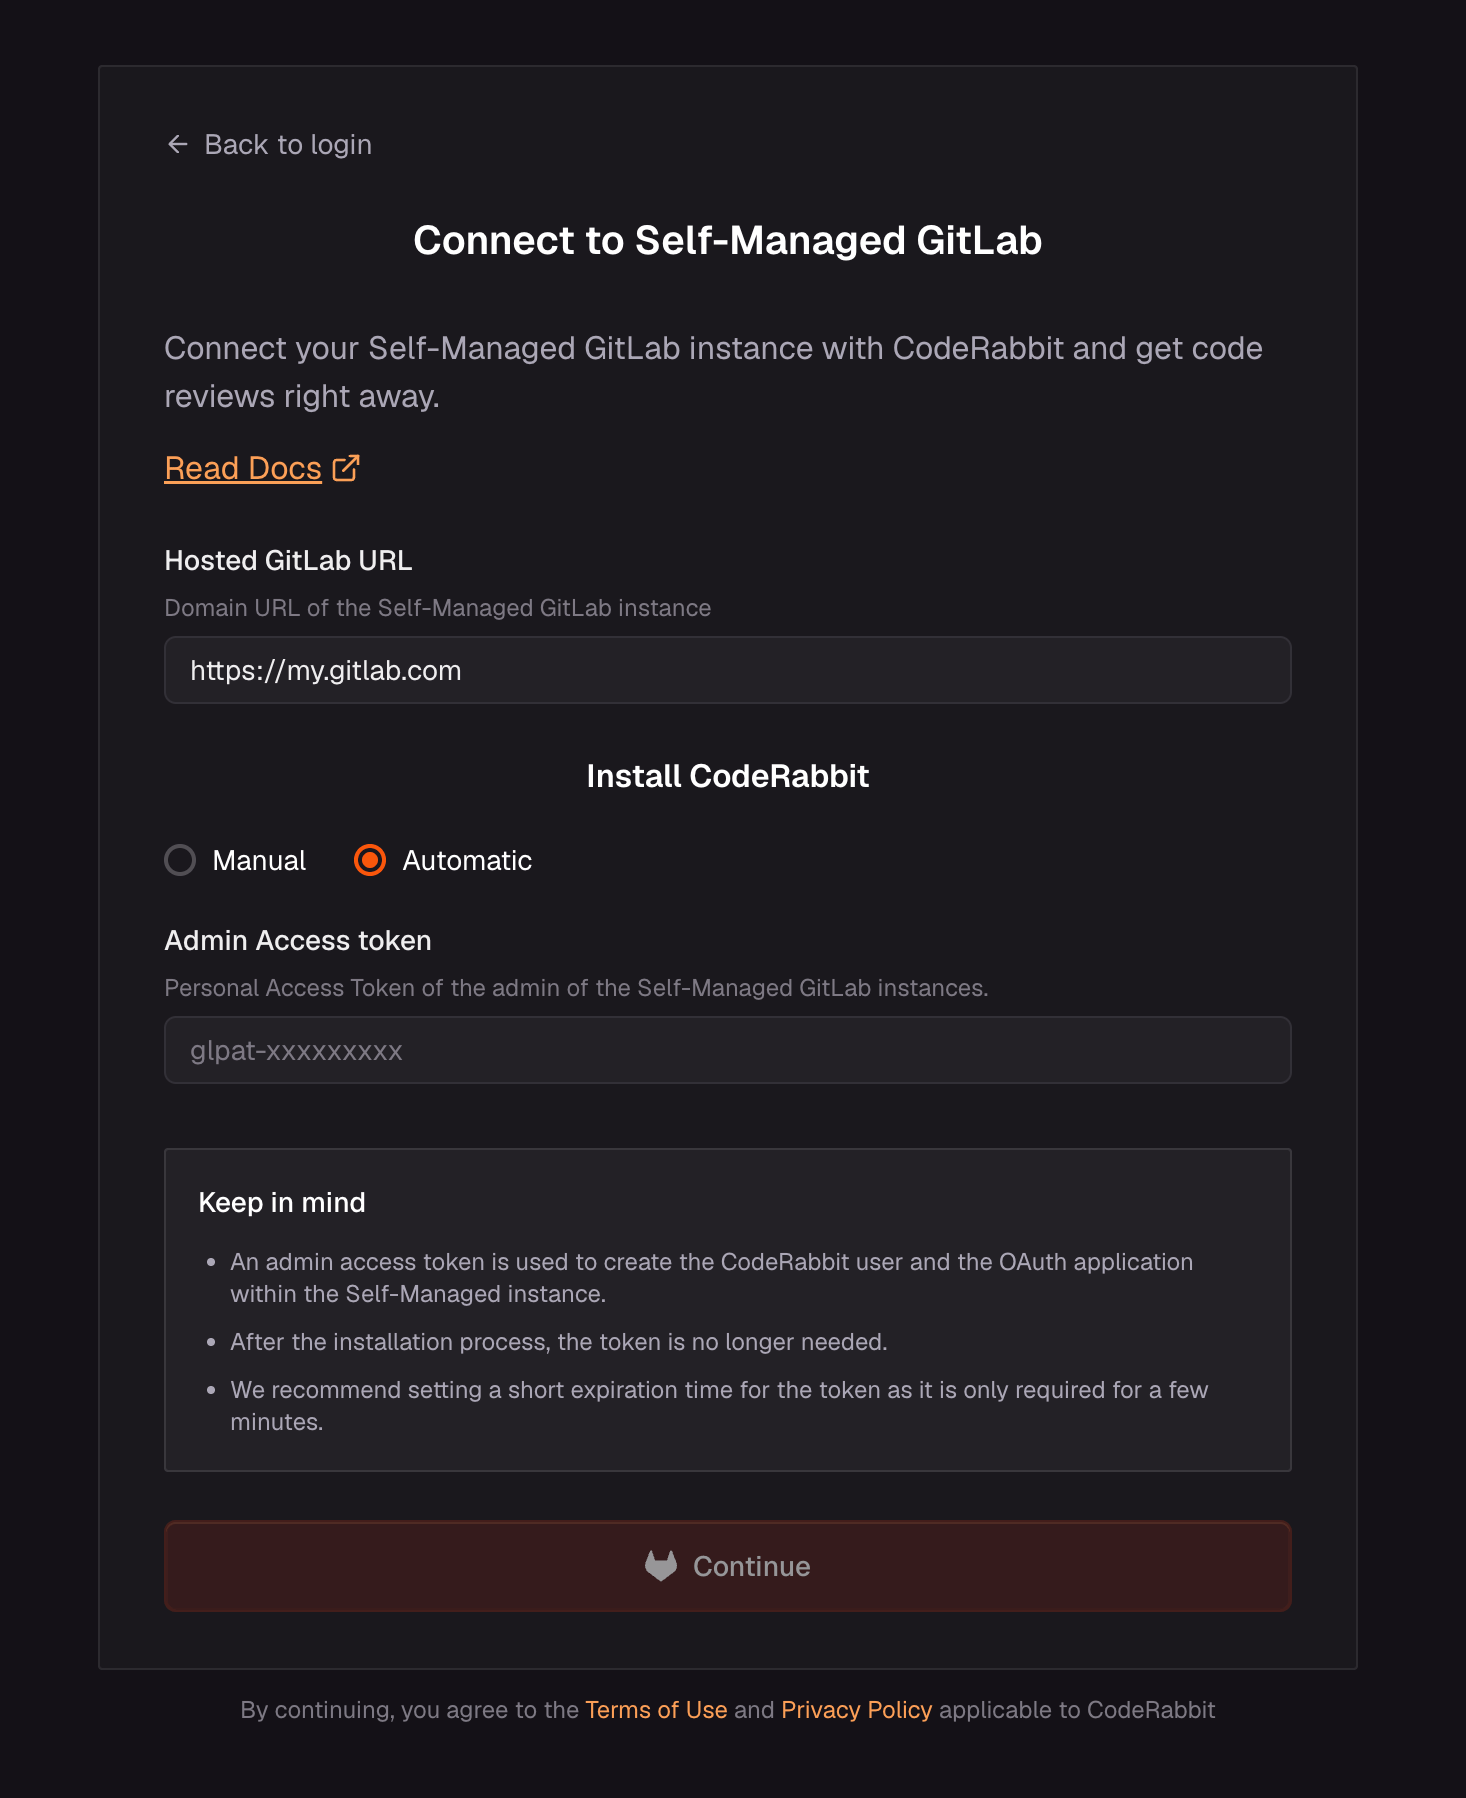
Automatic installation selected, with the Admin Access token field
Manual onboarding
For the manual onboarding process, you need to create the CodeRabbit user and the OAuth2 GitLab application.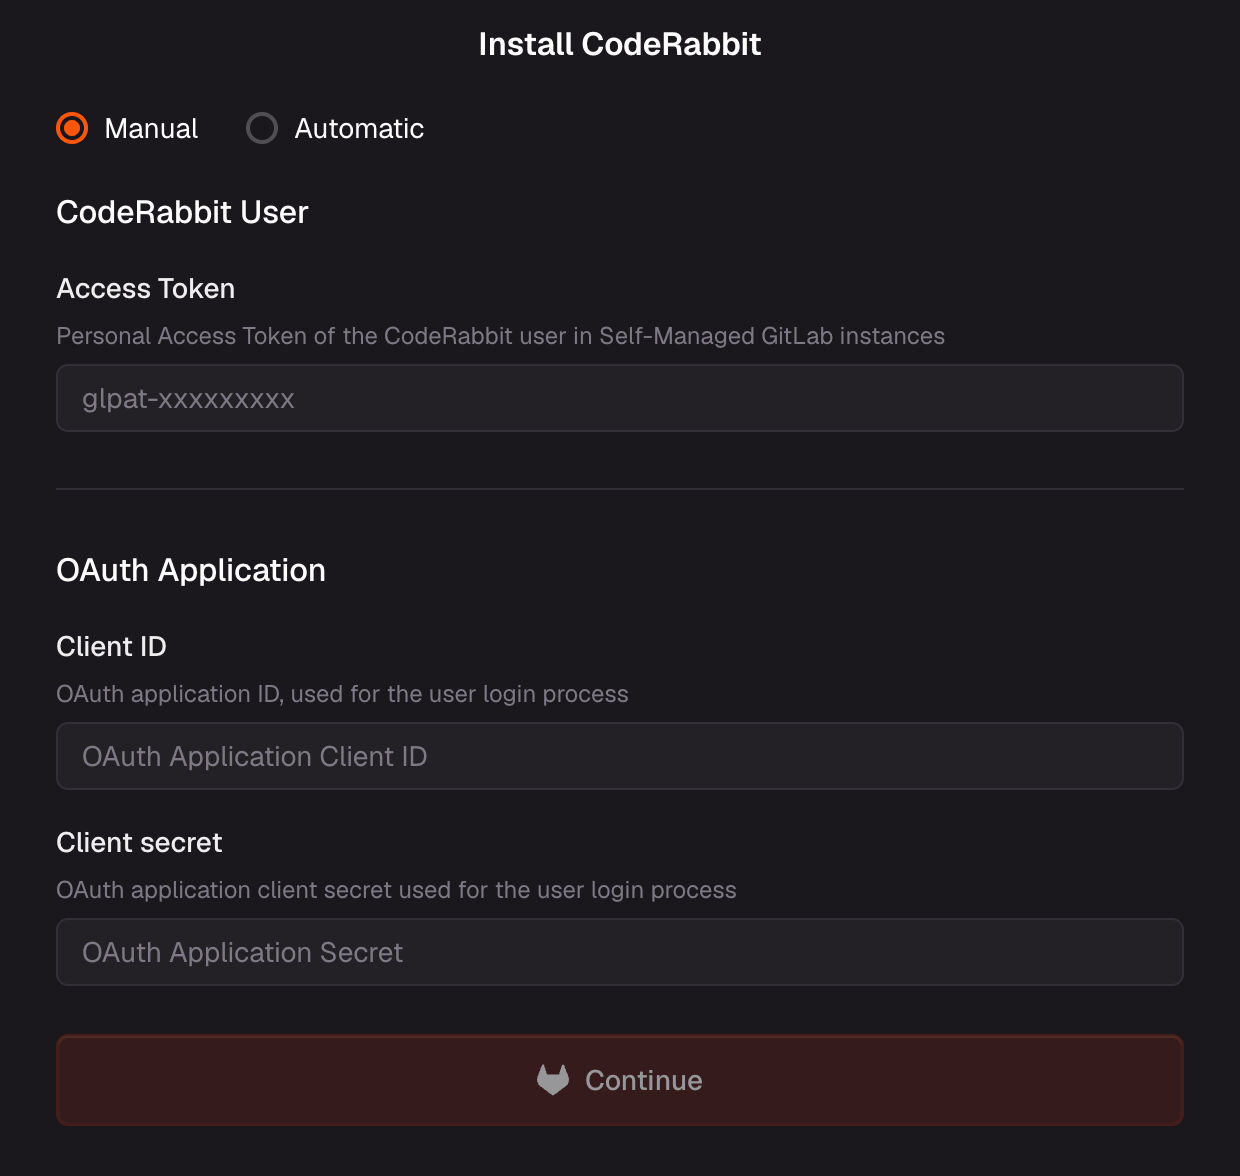
Manual installation selected, with fields for the CodeRabbit user access token and OAuth application credentials
Creating CodeRabbit user
This feature will work with any user from your organization, but we strongly recommend creating a dedicated user called CodeRabbitAI. This ensures clarity about which user is used for our application and allows for better fine-grained access control.@coderabbitai — or the username of the user you create here, if it differs.Create the user
Retrieve user information
Generate access token
- Use “CodeRabbitAI” as the username for easy identification
- Use the CodeRabbit logo as the profile picture for easy recognition
- Ensure the user has appropriate permissions for the repositories you want to integrate
Creating OAuth2 application
For self-managed GitLab, we recommend creating an instance-wide application unless you want the reviews to be limited to a single group or user. Follow the steps outlined in the GitLab documentation for creating the application.- Scopes:
api read_user email openid - Callback URL:
https://app.coderabbit.ai/login
Generating personal access token
GitLab offers an option to generate a personal access token for adding a new user and setting up the application in the self-managed instance.Login to your instance
Access user settings
Navigate to Access Tokens
Create new token
Configure token settings
- Enter a name and expiry date for the token
- We need this for the initial setup, so the minimum expiry time is sufficient
- If you do not enter an expiry date, it defaults to 365 days from the current date
-
Select the required scopes:
api,read_api,read_user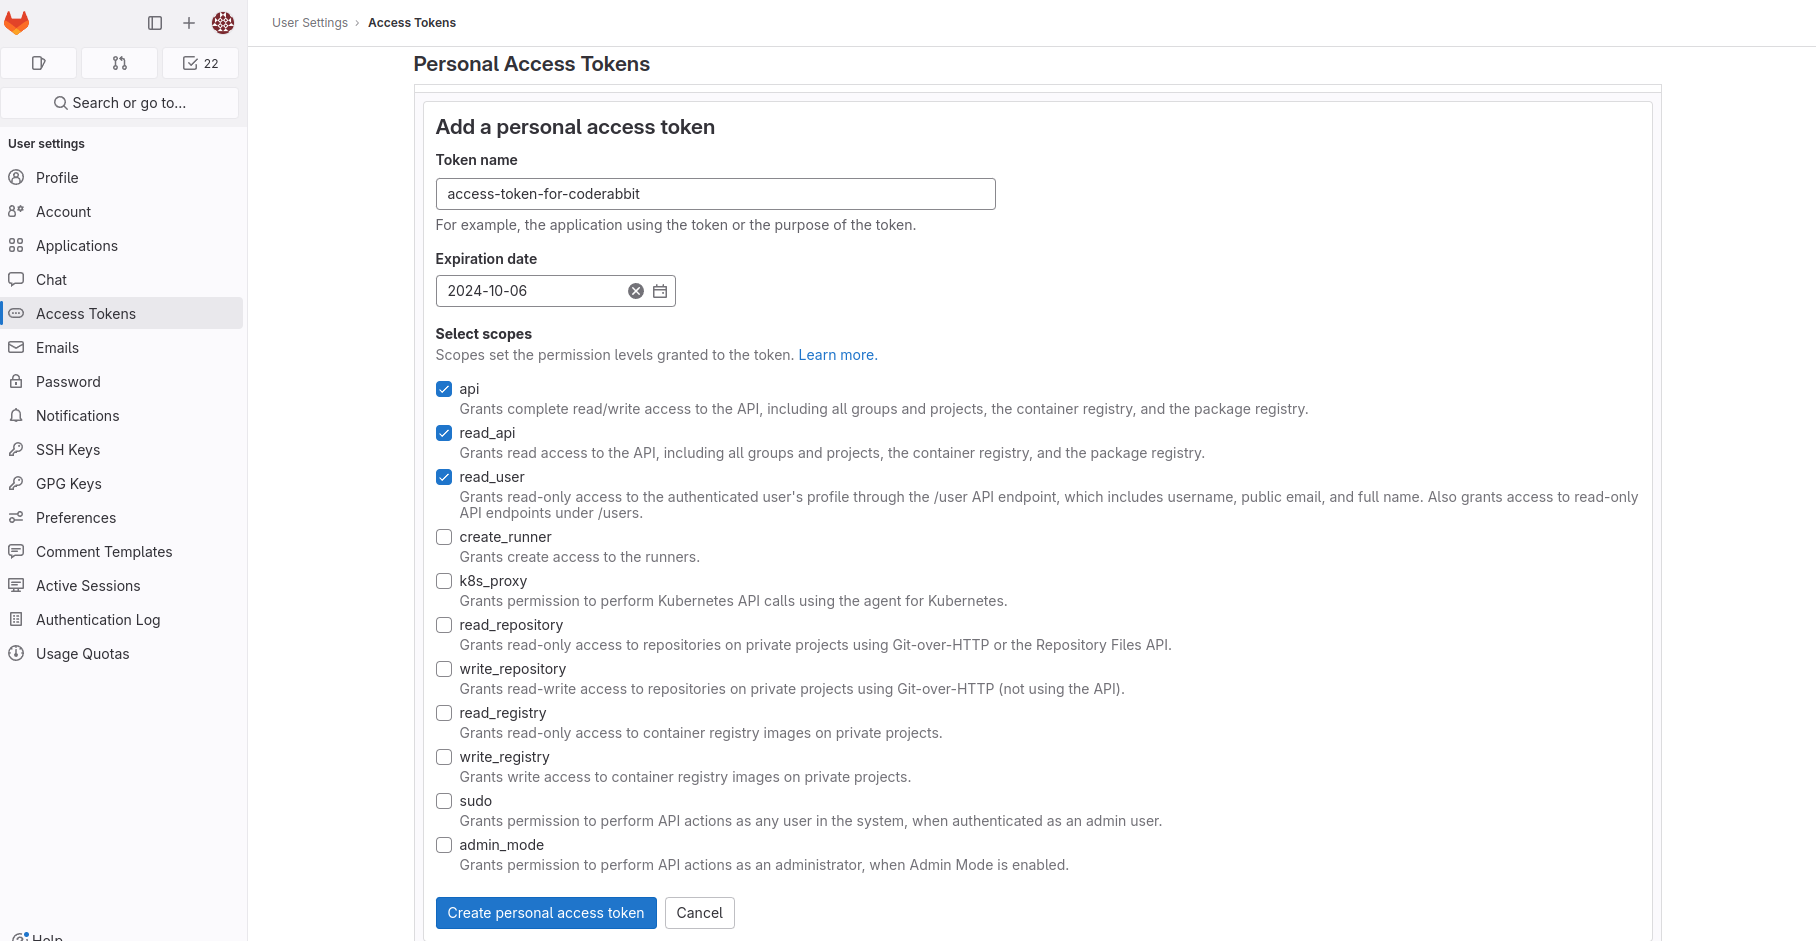
Generate and save token
Enter the token in CodeRabbit
Submit the details
After you have the CodeRabbit user, access token and OAuth2 application, paste the details into the manual onboarding form and submit it. We will handle the setup process for you. On subsequent visits, your setup will be automatically detected, allowing for direct login.
Allow list CodeRabbit IP address
Use these CodeRabbit IP addresses if your instance requires IP allow listing.Webhooks
CodeRabbit receives merge request, comment and issue events from your instance through webhooks. Install them manually, in bulk with a script, or update existing webhooks after changing the secret or destination.Manual webhook installation
Use this flow when you need to install a webhook manually or configure an organization-specific secret. To rotate an existing instance-wide shared secret, use Workspace Git credentials. The Webhook Secret page is available in CodeRabbit for supported Git providers, including GitLab.com and self-managed GitLab.Open Webhook Secret settings
Copy the webhook URL
Save or change the webhook secret
Configure the GitLab webhook
- Merge request events
- Comments
- Issues events
- SSL verification enabled
Bulk webhook installation
For administrators managing many GitLab projects, you can use a script to bulk-install webhooks across all projects. To update existing webhooks instead, use its migration mode. The script requires Bash 4 or later,jq 1.6 or later, and curl 7.55 or later.
Login to CodeRabbit UI
Copy the webhook URL and secret
Run script to install webhooks
- Your GitLab host URL
- The webhook URL you copied in the previous step
- The webhook secret you saved in the previous step
- A GitLab access token with API permissions
gitlab-webhook.sh script
gitlab-webhook.sh script
Example: Install webhook on a single project
Example: Install webhooks on all projects in a group (including subgroups)
Rotate the instance-wide shared secret
A workspace administrator can rotate an existing shared secret from Workspace → Git credentials. Select the GitLab instance, choose Rotate webhook secret, and enter the new secret and an active GitLab instance administrator token with API access. The administrator token is used for this rotation and is not saved. CodeRabbit automatically refreshes all group and project hooks across the instance whose URL exactly matches the CodeRabbit webhook URL before saving the shared secret, regardless of how they were created. Only hooks whose URL differs from the CodeRabbit webhook URL require manual updates. If rotation reports a recovery failure, check the affected hooks before retrying. The Account → Webhook Secret page directs shared-secret rotations to Git credentials. Organization-specific secrets continue to use the Account page.Migrate existing webhooks
Use themigrate command of gitlab-webhook.sh above to change existing project webhook URLs without deleting or recreating the hooks. Migration mode defaults to a dry run; the existing installation commands are unchanged.
Before applying changes, configure the destination CodeRabbit instance, workspace, bot access and webhook secret. For reverse-tunnel deployments, validate the route and GitLab access first. This script does not create a bot, change OAuth credentials, configure a tunnel or write to the CodeRabbit database. Existing repository records are not repaired simply by changing a webhook URL.
Inputs
GITLAB_TOKEN to a GitLab API token with permission to manage the selected project hooks. Migration mode reads credentials from environment variables, not command-line arguments. Do not place secrets in either URL. Treat reports as internal operational data because they contain project IDs, URLs and event settings.
For example, enter credentials using hidden prompts in Bash:
--apply and a new report filename, such as pilot-results.jsonl. To migrate a group, replace --project team/service-a with --group team; add --include-subgroups only when needed. The script discovers the current state again on every run, checks for changes immediately before each update, and sends the new URL and secret in the same PUT request. The hook ID, event selections, filters and SSL verification setting are preserved. It does not create or delete hooks.
If projects have different destination secrets, pass --secret-map project-secrets.json with a file like this, and export each named variable using hidden prompts:
Results and recovery
Each JSON line describes a plan or progress record. An illustrative successful update emits:ALREADY_TARGET_AUTH_UNVERIFIED means no URL update was needed, not that the secret is correct. NO_MATCH leaves the project untouched; CONFLICT requires choosing the correct hook before retrying. Errors return a nonzero exit code. A failure during apply stops later updates, but earlier successful updates remain applied.
UPDATE_OUTCOME_UNKNOWN means the request failed without confirming whether GitLab applied it. Inspect that hook before retrying; the script never automatically retries a write. VERIFY_FAILED means the update could not be confirmed by reading the hook back. Reports record the old URL and settings before the write, but never the token. Rollback requires updating the same hook with its old URL and a separately retained old secret; restoring only the URL is not sufficient. Automatic rollback is not performed.
With --test, TEST_REQUESTED_DELIVERY_UNVERIFIED means GitLab accepted the test request. Check the hook’s Recent events for the actual response and CodeRabbit logs for authentication and processing. Then create or update a real pilot merge request and verify that the existing bot posts a review before continuing with the group. A successful HTTP response alone does not prove review completion.
Repository installation
After completing onboarding, install CodeRabbit on individual projects or across a GitLab group from the Repositories page in the CodeRabbit app. The permission model and steps are the same as for GitLab.com — see Repository installation for details. After a group installation, repositories later created in or added to that group and its subgroups are activated automatically when their first merge request or pull request is opened. See Automatic installation for new group repositories for the prerequisites and expected behavior. GitLab.com tier restrictions described there do not necessarily apply to self-managed GitLab; availability depends on your GitLab license and instance configuration.SSH repository access
By default, CodeRabbit clones your GitLab projects over HTTPS. If HTTPS is not available or your organization prefers SSH for repository access, you can configure SSH clone credentials in the CodeRabbit web app.Prerequisites
- An SSH key pair generated without a passphrase. CodeRabbit cannot use passphrase-protected keys.
- The public key must be registered on the GitLab account used by CodeRabbit under Edit profile → SSH Keys. GitLab will deny SSH access if the public key is not registered!
-
The GitLab server’s trusted SSH host-key record (
known_hosts) is required. CodeRabbit rejects SSH setup without it. See the GitLab documentation on SSH keys.
Configure SSH clone credentials
Log in to CodeRabbit
Open account settings
Navigate to SSH Clone Credentials
Enter your SSH credentials
pbcopy (macOS) or xclip (Linux) to copy each key file to your clipboard, then paste directly into the corresponding field.Save your credentials
known_hosts record, or an unsupported GitLab hostname causes SSH cloning to fail closed instead of trusting the first connection. A missing or invalid known_hosts record never falls back to insecure host trust.CodeRabbit retains the configured GitLab host, SSH key, trusted host, and optional custom port for later fetches and cached-checkout reuse, so follow-up fetches use the same authentication as the initial clone.Troubleshooting
SSH cloning fails at setup
SSH cloning fails at setup
known_hosts record in the known_hosts field, then save the SSH clone credentials again.SSH clone succeeds but a later fetch fails
SSH clone succeeds but a later fetch fails
SSH does not connect on a non-default port
SSH does not connect on a non-default port